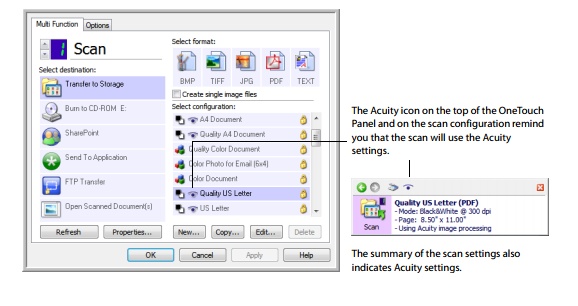
The OneTouch software you received with your scanner includes the Visioneer® Acuity technology. This application has a set of features for improving and enhancing the quality of scanned documents, especially documents that would usually produce poorer quality images. Scan configurations with Acuity options work with OneTouch scan settings to produce the best quality images.
If Visioneer Acuity is available for your scanner, it will be installed automatically when installing the scanner driver from the installation disc. If you download the driver from our website, the download page will indicate which installer contains Visioneer Acuity. Visioneer Acuity is not available if it is not described in the download page for your scanner.
The instructions in this section only apply if the scanner you purchased included Visioneer Acuity on the installation disc. For all other scanners, please continue on to the instructions for adjusting options on the Advanced Settings Tab.
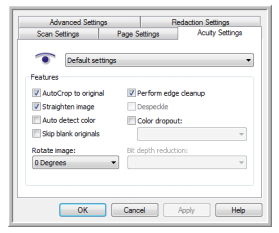
Click the drop-down arrow to choose the type of Acuity settings to use for the new scan configuration. The options are:
■ Do not use Acuity image processing—scanning will not use the Acuity processing.
■ Default settings—automatically selects the options your scanner can use with any scan mode (Black & White, Grayscale, and Color).
Select the options for scanning
■ Auto-Crop to original—select this option to let the software automatically determine the size of the item being scanned.
■ Straighten image—select this option to have the software automatically determine if a page is skewed, then straighten its image. If the page is scanned at too great an angle, the image may not straighten correctly. In that case, re-scan the page.
■ Auto detect color—determines if a document contains color or not and produces the appropriate scanned image. Instead of you having to change the scan settings from Color to Black & White and back again, the scanner can choose the correct settings automatically.
■ Skip blank originals—recognizes when a page is blank and removes its image.
■ Rotate image—select an option in this list to have the final image rotated when scanning is complete.
■Flip back side—select this option if you are scanning duplex pages that are calendar style orientation. This option will rotate the back side image 180 degrees from the front side. When scanning in duplex mode without this option selected, the back side image of calendar orientation pages will appear upside down in the final scan. This option does not automatically determine book page orientation versus calendar page orientation. If you have this option selected when scanning book orientation pages, the image for the back side of the page will appear upside down in the final scan. If you are scanning a batch of documents that contain both types of orientation, we recommend that you select Automatic in the rotate image list.
■ Perform edge cleanup—select this option to have the software remove any thin lines that may be around the edges in the scanned image. Edge Cleanup only applies if Auto-Crop and Auto De-skew are selected so the software can determine where the edges are located. Therefore, selecting Edge Cleanup will also select Auto-Crop and Auto De-skew. This option is only available when scanning in Black & White.
■ De-speckle—speckles are small spots on an image that the scanner interpreted as a valid part of the document. The De-speckle option identifies these spots and removes them. This option is only available when scanning in Black & White.
■ Color dropout—color dropout is the ability of your scanner to automatically remove a color from a scanned image. For example, if you are scanning a letter with a red watermark, you can choose to filter out the red so the scanned letter just shows the text and not the red watermark. Color dropout applies to Black & White or Grayscale scanning modes.
■ Bit depth reduction—click the drop down menu and select an option from the list. The Bit depth reduction options are only available when scanning in black and white.
● Error diffusion, Bayer, and Halftone patterns are the intentional application of noise (dithering) in the image to help alleviate banding when scanning in binary (black and white) mode. For example, if you scan a color photo in black and white, the image file will have large blocks of black and white and the image barely recognizable. Dithering the image creates a black and white image that is recognizable.
● Dynamic threshold attempts to evaluate the scanned page and automatically adjust the brightness and contrast levels to produce the best quality image when scanning in black and white.